Handprint Snowman Ornament

Supplies needed:
- Circle Template–> handprint snowman circle template
- Cardstock – white, blue, black
- Markers – white, orange, assorted colors
- Black pen
- Hole punch
- Twine
- Scissors
- Glue stick
Directions:
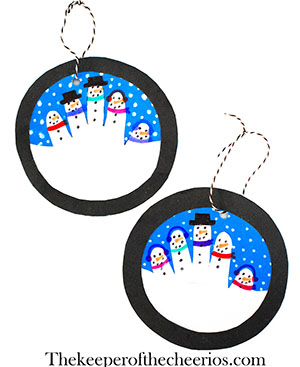
Begin by tracing the little one’s hand on a piece of white paper or cardstock.
Cut out the handprint.
Now, print the circle template. You will need 3 of the same size circles in white, black, and blue cardstock.
Cut the white circle in roughly half.
Have an adult carefully insert scissors in the black circle and cut out the inside, leaving about a half inch edge.
Next, glue the handprint to the blue circle. Trim the handprint from the wrist if needed to fit in the circle better.
Glue the half white circle over the bottom of the handprint, making sure the fingers all poke out.
Then use a black pen to draw eyes and mouths on the fingers. Also use the black pen to draw buttons.
Use an orange marker to give the snowmen noses.
And use a variety of colors of markers to give the snowmen scarves and ear muffs. Use the black pen to give a few top hats, as well.
Use a white marker to make dots around the snowmen for snow.
Once decorated, glue the black edge around the snowmen.
Finally, punch a hole at the top of the circle.
Cut a strand of twine and guide through the hole. Tie in a loop. Your super sweet snowman family ornament is now ready to hang on the tree!