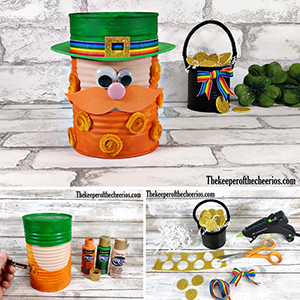
Tin Can Leprechaun

RECYCLED TIN CAN LEPRECHAUN AND POT OF GOLD
Straight out of the recycle bin, this Tin Can Leprechaun and Pot of Gold are quick and easy to create with the kiddos in an afternoon with simple supplies from the Dollar Store.
Supplies:
- Recycled Cans – (Large Bean and Mini Veggie sizes)
- Acrylic Craft Paint – White, Black, Orange, Green, and Flesh Tone of Choice
- Craft Foam, Green, Orange, and Gold Glitter – Dollar Store
- Chenille Stems, Black and Orange – Dollar Store
- Wiggle Eyes – Dollar Store
- Rainbow Ribbon – 1/2″ wide Grosgrain
- Button, Pink
- Paper Shred or Tissue Paper
- Paintbrush
- Scissors
- Pencil or Marker
- Glue Gun and Glue Sticks
- Tin Can Leprechaun and Pot of Gold Patterns
Instructions:
STEP ONE
To begin, gather all supplies. Wash and dry the metal cans, then apply a base coat of white acrylic paint to the large bean can. Set aside to dry and apply a second coat, if necessary. Basecoat the small veggie can with black acrylic paint. Set aside to dry and apply a second coat, if necessary.
STEP TWO
Paint a three-inch band of green acrylic paint around the top of the large bean can. Download, print, and cut out Tin Can Leprechaun and Pot of Gold Patterns. Trace the face pattern onto the large bean can and paint with flesh tone acrylic paint of choice. Paint remainder of large bean can with orange acrylic craft paint.
Let paint colors dry completely and then apply a second coat of the green, flesh tone and orange acrylic paints, if necessary.
STEP THREE
Trace hat brim pattern onto green craft foam with a with a pencil or marker. Trace mustache pattern onto orange craft foam with a pencil or marker. Cut out patterns with scissors.
Slide hat brim onto can where the green paint ends. The ridges in the can will hold the brim in place, but you can secure with glue. Attach the wiggle eyes, button nose and mustache to the leprechaun’s face with a glue gun and glue sticks.
STEP FOUR
Cut three orange chenille stems in half and then in half again. Twist each of the twelve pieces of orange chenille stem into swirl shapes. Attach to orange-paint beard of leprechaun with a glue gun and glue sticks.
Glue rainbow ribbon around the leprechaun to create a hat band. Measure and cut a one-inch square of gold glitter craft foam. Fold in half and cut a smaller square from the center to create a buckle. Glue buckle to front center of leprechaun hat.
STEP FIVE
Twist two black chenille stems together. Wrap around the top of the small veggie can Pot of Gold, twisting to secure. Bend remaining section of chenille stem into a handle and secure to the opposite side of the Pot of Gold by twisting.
Trace circle patterns onto the backside of the gold glitter craft foam and then cut out with scissors. Fill Pot of Gold with crinkle paper shred or tissue paper and then add the gold glitter craft foam coins.
Dig into that recycle bin, get the kiddos involved, and create your very own Leprechaun and his Pot of Gold, and display on the mantel for St. Patrick’s Day.