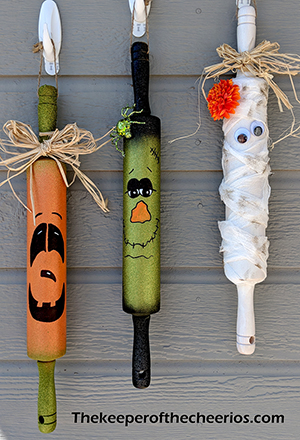
Halloween Rolling Pins
These whimsical Halloween Rolling Pins are so fun and great to hang in your kitchen for the holidays, not only are they super fun but they look adorable.
Love these? See our Christmas Rolling Pins HERE

Materials:
- Rolling pins (find a 3 Pack HERE)
- Craft paints or basic spray paints – Green, Black, White, and Orange
- Glitter Blast Spray paints (Orange, Citrus Green, Diamond Dust, Starry Night) Find some HERE
- Black, White and Orange craft paints for the face details
- Paint Brush
- Black Sharpie
- Raffia
- Flower or bow
- Wiggle eyes
- String or twine
- Cheese cloth
- Antiquing pad – optional
- Scissors
- Glue- I used a hot glue gun
Directions:
- Base your rolling pins in either craft paint or spray paint
- Add your glitter blast over the top once dry
- Let your glitter blast dry for several hours or the recommended 24 hours
- Once dry and cured you can start adding your details
- For the pumpkin we used a sharpie to fill in the face details and glued on some raffia at the top in a bow shape
- For your mummy we wrapped some cheese cloth around the white rolling pin – tacking in place with glue
- Glue on or paint on some eyes, add a raffia bow and and flower or bow
- For Frankie we drew on the face with a sharpie and filled in some white and black craft paints for the eyes and orange craft paint in the nose,lastly we added a spider to his head
- Once you are happy with your rolling pins add some twine or string to the handle to hang them from
- enjoy


This post contains affiliate links